

Have you ever been scrolling Instagram and suddenly found yourself captivated by dazzling photos of a product you didn’t even know you needed? Suddenly, you go from liking photos of your friends and giggling at memes to entering your credit card information because that beautifully shot creation is now something you can’t live without. That’s the magic of good product photography!
You may think you need a professional photographer on your payroll to make this kind of magic happen for your own business, but that’s not the case. Shooting your own amazing product photos is easier than you think when you have the right tools and a little imagination. Here are ten DIY tips to help you boost sales with visually stunning product photos.
Start with a Good Camera Phone
Gone are the days when you had to rely on expensive, professional equipment to produce the high-quality photos it takes to level up your brand. In fact, you likely have everything you need in your purse or pocket, as most smartphones come equipped with cameras that rival the quality of any professional camera. Get to know your camera settings so you can make the most of what you have (lense, speed, and macro settings are a good place to start), and you’re good to go!
Lighting is Everything
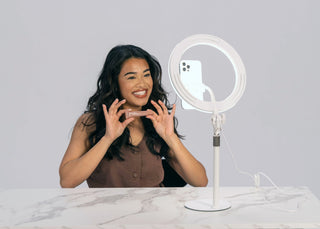
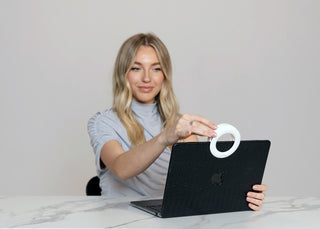
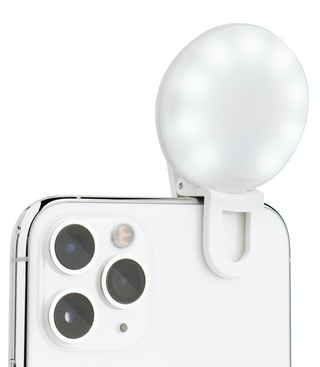
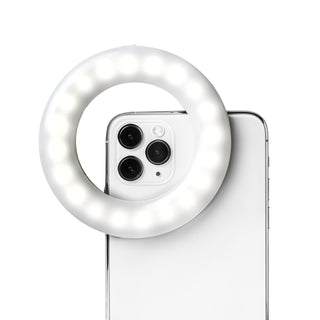
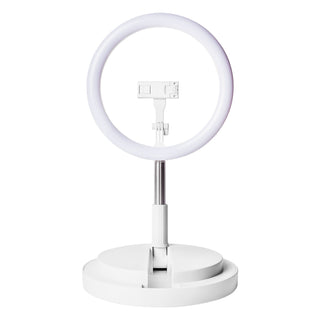
The right lighting can make or break a photoshoot, but if you don’t happen to have a professional studio setup lying around, try a small LED ring light like the LITTIL Selfie One. This handy circle light clips right to your smartphone, tablet, or laptop and can illuminate your photos in even the darkest rooms. With 60 high-powered LEDs that provide three different light tones and ten different brightness settings, this small but mighty mini ring light has everything you need to create your desired aesthetic. It even comes with a built-in rechargeable battery, USB to USB-C adapter, and three foot long USB cord, which means you can quickly charge it (even while in use) within 30 minutes.
Frame Photos With the Right Background
Your product should always be the star of the show, so make sure you use a background that compliments the items without taking the attention away. If you want to go for a clean, crisp look, then try a white or solid-colored backdrop for your photos.

If you want to add an element of texture to your shots, you can use a pre-made backdrop like these pieces from Dropawall that are affordable, easy to use, and give you the option to change your background without changing up your entire space.
Shoot from Multiple Angles
Whether you’re taking photos for your website, social media, or both, you’ll want to show multiple angles of your product so potential customers can get the full scope of what you’re offering. That means you should shoot products from all angles - top, bottom, front, back, and side-to-side, so they get the full experience. You don’t necessarily have to use all the photos at once, but it’s good to have a wide selection to choose from as you decide which image goes on which medium.
Mix Things up With Active and Minimalist Shots
Variety is the spice of life, and that applies to product photos as well. Two key photo types you need are both active and minimalist shots. Here’s a quick rundown of what that means:
Minimalist Shots are simple photos that focus on one or two subjects. These are great for showcasing the fine details of your products.
Action Shots show your product in action and feature other subjects (usually a person) putting the items to the test. The LITTIL Selfie One is great for this type of shot.

Get Inspired
Beautiful product shots are a great way to build your brand and show what makes your products unique, but that doesn’t mean you can’t look to other creators for inspiration. Take some time to peruse social media to see what other companies are doing and note what you feel works well and what doesn’t. This will give you a clear starting point when mapping out your own photo concepts so you can create images that convert into big sales.
Use Props to Your Advantage
The right props can really bring your product photos to life, so long as you use items that compliment your products rather than take the attention away from them. Try props that are in the same color palette as the products you’re showcasing, and avoid anything too ostentatious.

Tailor Photos for Different Mediums
What works on one medium may not translate well on another, so be sure to plan your photoshoots accordingly. Simple, bold, and visually pleasing shots tend to work best on social media and have a greater chance of bringing in the likes and followers you need to build your online presence. On your company website and other eCommerce platforms such as Etsy and Amazon, it’s essential to include lots of action shots and photos shot from various angles, as we mentioned above. These elements are important because they could be the difference between someone busting out their credit card or leaving without making a purchase.
Don’t Forget Your Test Photos
We live in the age of the selfie, so you likely already know how important it is to take as many photos as possible to get the right shot. That’s why many influencers spend so much time taking pictures in various locations and types of lighting before they settle on a concept. The same goes for professional-looking product shots, so spend some time photographing your products in as many different situations as you can so you know what works and what doesn’t. For example, maybe your product looks dull indoors but completely fabulous when photographed outdoors. Or perhaps you need to stick to specific color backdrops to pull the right hues. Either way, you won’t know until you do some test shots.
Use a Good Editing App
Editing can often be where the real magic happens. Sure, it’s vital to start with amazing photos, but the right editing can really set things off and give your images the impact you need to bring in new business. If you have the time and resources, learn how to use Photoshop or another editing tool like Canva. LinkedIn has a ton of free courses you can use to learn these programs inside and out. If you would rather stick with an app, there are many highly-rated photo and video editing apps out there to help you glow up your shots. Take some time to shop around, check out reviews, and ask other business owners what they use. It will be well worth the effort!
Now you have the tools you need to promote your products with stunning visuals, so get out there and create a LITTIL magic of your own!